> ## Documentation Index
> Fetch the complete documentation index at: https://runpod-b18f5ded-lg-pod-locking-billing-updates.mintlify.site/llms.txt
> Use this file to discover all available pages before exploring further.
# Connect to workers with SSH
> SSH into running workers for debugging and troubleshooting. Review setup, configuration, deployment, and operations guidance for Runpod Serverless.
You can connect directly to running workers via SSH for debugging and troubleshooting. By connecting to a worker, you can inspect logs, file systems, and environment variables in real-time.
## Generate an SSH key and add it to your Runpod account
Before you can connect to a worker, you'll need to generate an SSH key and add it to your Runpod account.
Run this command on your local terminal to generate an SSH key, replacing `YOUR_EMAIL@DOMAIN.COM` with your actual email:
```sh theme={null}
ssh-keygen -t ed25519 -C "YOUR_EMAIL@DOMAIN.COM"
```
This saves a public/private key pair on your local machine to `~/.ssh/id_ed25519.pub` and `~/.ssh/id_ed25519` respectively.
If you are using Command Prompt on Windows instead of the Linux terminal or WSL, your public and private key pair will be saved to `C:\Users\YOUR_USER_ACCOUNT\.ssh\id_ed25519.pub` and `C:\Users\YOUR_USER_ACCOUNT\.ssh\id_ed25519`, respectively.
Run this command on your local terminal to retrieve the public SSH key you just generated:
```sh theme={null}
cat ~/.ssh/id_ed25519.pub
```
This will output something similar to this:
```sh theme={null}
ssh-ed25519 AAAAC4NzaC1lZDI1JTE5AAAAIGP+L8hnjIcBqUb8NRrDiC32FuJBvRA0m8jLShzgq6BQ YOUR_EMAIL@DOMAIN.COM
```
Copy and paste your public key from the previous step into the **SSH Public Keys** field in your [Runpod user account settings](https://www.console.runpod.io/user/settings).
If you need to add multiple SSH keys to your Runpod account, make sure that each key pair is on its own line in the **SSH Public Keys** field.
## SSH into a worker
Before you can connect, you need at least one worker running. To guarantee a worker is available:
1. Navigate to the [Serverless section](https://www.console.runpod.io/serverless) of the Runpod console.
2. Select your endpoint from the list.
3. Go to the **Configuration** tab.
4. Under **Worker configuration**, set **Active workers** to 1 or more.
5. Click **Save** to apply the changes.
This ensures at least one worker remains running at all times, and allowing you to SSH in without your worker being automatically scaled down.
Select the **Workers** tab in your endpoint's details page to view all running workers for this endpoint.
Here you'll see a list of all workers associated with your endpoint. Find a worker with a status of **Running** and click on it to open its detail pane.
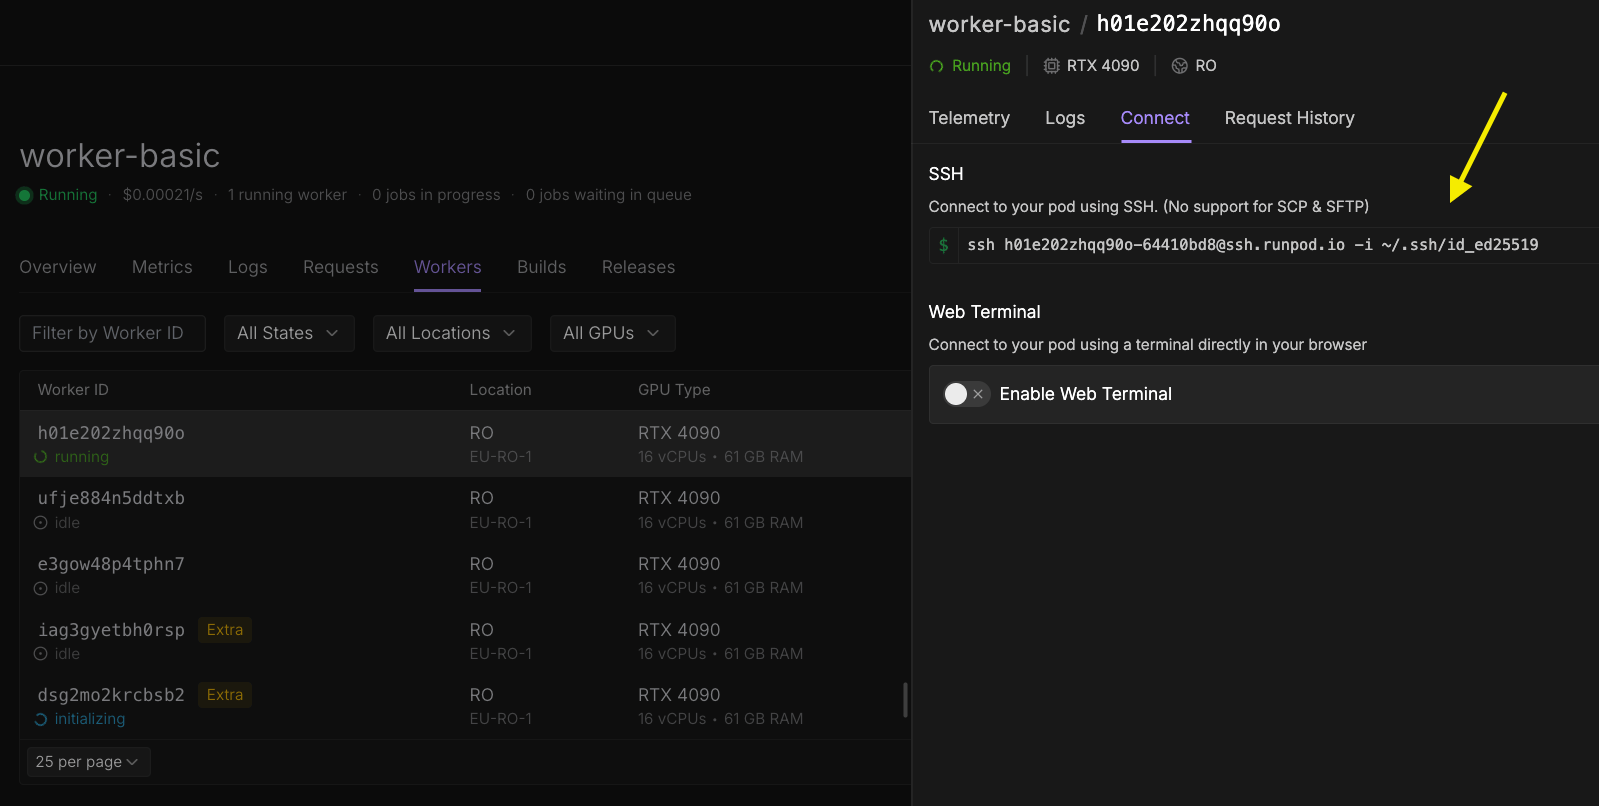 In the worker's detail pane:
1. Select the **Connect** tab.
2. Under the **SSH** section, copy the provided SSH command.
The command will look similar to this:
```bash theme={null}
ssh root@worker-id-xyz -i ~/.ssh/id_ed25519
```
If you saved your SSH key to a custom location, update the path after the `-i` flag to match your key's location.
Open your local terminal and paste the SSH command you copied. Press Enter to connect to the worker.
Once connected, you can:
* Inspect logs and debug output.
* Check environment variables with `env`.
* Verify file systems and mounted volumes.
* Test your worker's behavior in the production environment.
* Run diagnostic commands to troubleshoot issues.
## Troubleshooting SSH key authentication
If you're asked for a password when connecting to your worker via SSH, this means something is not set up correctly. Runpod does not require a password for SSH connections, as authentication is handled entirely through your SSH key pair.
Here are some common reasons why this might happen:
* If you copy and paste the key *fingerprint* (which starts with `SHA256:`) into your Runpod user settings instead of the actual public key (the contents of your `id_ed25519.pub` file), authentication will fail.
* If you omit the encryption type at the beginning of your public key when pasting it into your Runpod user settings (for example, leaving out `ssh-ed25519`), the key will not be recognized.
* If you add multiple public keys to your Runpod user settings but do not separate them with a newline, only the first key will work. Each key must be on its own line.
* If you specify the wrong file path to your private key when connecting, SSH will not be able to find the correct key (`No such file or directory` error).
* If your private key file is accessible by other users on your machine, SSH may refuse to use it for security reasons (`bad permissions` error).
* If your SSH configuration file (`~/.ssh/config`) points to the wrong private key, you will also be prompted for a password. Make sure the `IdentityFile` entry in your config file matches the private key that corresponds to the public key you added to your Runpod account.
In the worker's detail pane:
1. Select the **Connect** tab.
2. Under the **SSH** section, copy the provided SSH command.
The command will look similar to this:
```bash theme={null}
ssh root@worker-id-xyz -i ~/.ssh/id_ed25519
```
If you saved your SSH key to a custom location, update the path after the `-i` flag to match your key's location.
Open your local terminal and paste the SSH command you copied. Press Enter to connect to the worker.
Once connected, you can:
* Inspect logs and debug output.
* Check environment variables with `env`.
* Verify file systems and mounted volumes.
* Test your worker's behavior in the production environment.
* Run diagnostic commands to troubleshoot issues.
## Troubleshooting SSH key authentication
If you're asked for a password when connecting to your worker via SSH, this means something is not set up correctly. Runpod does not require a password for SSH connections, as authentication is handled entirely through your SSH key pair.
Here are some common reasons why this might happen:
* If you copy and paste the key *fingerprint* (which starts with `SHA256:`) into your Runpod user settings instead of the actual public key (the contents of your `id_ed25519.pub` file), authentication will fail.
* If you omit the encryption type at the beginning of your public key when pasting it into your Runpod user settings (for example, leaving out `ssh-ed25519`), the key will not be recognized.
* If you add multiple public keys to your Runpod user settings but do not separate them with a newline, only the first key will work. Each key must be on its own line.
* If you specify the wrong file path to your private key when connecting, SSH will not be able to find the correct key (`No such file or directory` error).
* If your private key file is accessible by other users on your machine, SSH may refuse to use it for security reasons (`bad permissions` error).
* If your SSH configuration file (`~/.ssh/config`) points to the wrong private key, you will also be prompted for a password. Make sure the `IdentityFile` entry in your config file matches the private key that corresponds to the public key you added to your Runpod account.